The Tunnel Mine

Between Bluebell Town and Konohana Town is a tunnel that connects the villages together. At the beginning of the game you'll find that the Goddess intentionally collapsed the tunnel to stop the villagers from contacting each other. As you play through the game you will repair the tunnel and the villages' friendship.
Once the tunnel is repaired, you can run through it and randomly find Scrap Metal, Copper, Silver, or even Ore Stone on the ground each day. These random ground items are not what the Harvest Goddess means when she refers to being able to gain access to a mine.
If you continue to expand the tunnel you'll discover that there's a hidden mine half-way through it! To access the mine you'll need to do the following:
- Complete the tunnel between the two towns by participating in the seasonal cooking festivals. As you gain 3 hearts of friendship with the mayors, Eileen will post a "Through the Tunnel" request on the Bluebell message board on the first day of the new season. You'll need to complete this request three times before the path between the towns has been repaired.
- Expand your farm to 100% in size. You'll need to complete all of Eileen's farm construction requests and then stay on the farm. If you move to the other farm and it's not at 100%, then you will simply get another farm renovation request instead of moving towards unlocking the mine.
- Make sure your Request Level is at 5 or higher.
- Because your farm is at 100%, Eileen's last renovation request will be the "A Hot Spring" request. The spa will cost 2,000,000 G, 50 Material Stone, and 50 Lumber.
- Now that she's out of construction work (don't move farms!), Eileen will prompt you for the fourth "Through the Tunnel" request. Bring her 10 Lumber, 10 Material Stone, and 500,000 G. This will unlock a southern path through the tunnel, but you won't find any gems there; just another opportunity to find Scrap Metal, Copper, Silver, and Ore Stone.
- Finally, you will get the mine request. It will cost 1,000,000 G, 10 Material Stone, and 10 Lumber.
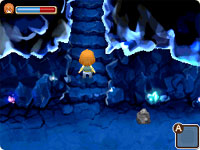
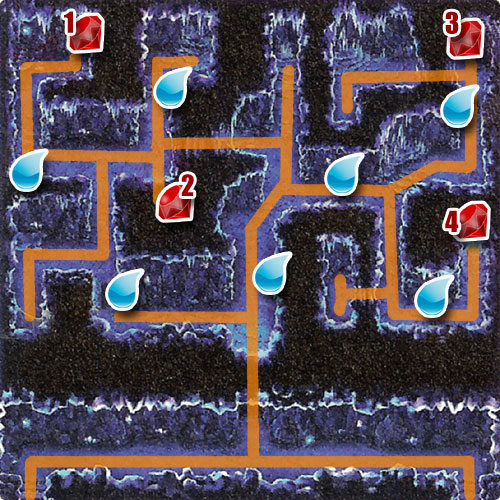
Access to the mine will be from staircases on the northern wall of the tunnel. Each day you can find ores and gems from the four foraging spots inside the mine. Just like looking for wild items in the mountain, walk up to one of the four spots and press A until you see the "There's nothing here." message. Then move onto the next one. You do not need to use your Hammer.

The path through the mine is very dark. If you want more visible light, you can have Oracle make the Night Vision alchemy potion. You will need to bring her a Strawberry, a Carrot, and Fluorite. After you eat the potion, you can see better in the mine tunnel but it's not completely clear. Your vision will be expanded for the rest of the day.

Along the path of the mine you will come across geysers. If you walk across the geyser while it is erupting, you will be pushed out of the mine and land at the bottom of the waterfall in the Konohana mid-mountain area! The geysers erupt about every 15 minutes in-game so be careful when walking up to one. It is more efficient to wait for the eruption and then run over the geyser than to have to run all the way back to the mine from the mountain area.
Just like with the mountain items, the star rank of the foraged ores and gems will be determined by the year you are in. In year three you can get ores and gems from 2.5 to 3 stars, year four is 3 to 3.5 stars, and between year five and year nine you'll find 4 to 4.5 star rank items. You can't find 5 star rank items until year ten.
The ores and gems in the four mine foraging spots are not seasonal. You'll find the same items all year long.
List of Mine Items
| Item Name | Mining Spots Spot 1 through 4 | Ship Price 1 Star to 5 Stars |
|---|---|---|
| Scrap Metal | All 4 spots | 12 G | 16 G | 20 G | 24 G | 26 G |
| Copper | Spots 1 and 3 | 600 G | 800 G | 1000 G | 1200 G | 1400 G |
| Silver | Spots 1 and 3 | 5400 G | 7200 G | 9000 G | 10,800 G | 12,600 G |
| Gold | Spots 1 and 3 | 6000 G | 8000 G | 10,000 G | 12,000 G | 14,000 G |
| Mithril | Spots 1 and 3 | 3840 G | 5120 G | 6400 G | 7680 G | 8960 G |
| Orichalcum | Spots 1 and 3 | 3840 G | 5120 G | 6400 G | 7680 G | 8960 G |
| Mythic Ore | Spots 2 and 4 | 1 G | 2 G | 2 G | 2 G | 3 G |
| Adamantite | Spots 1 and 3 | 3840 G | 5120 G | 6400 G | 7680 G | 8960 G |
| Stone Tablet | Spots 1 and 3 | 600 G | 800 G | 1000 G | 1200 G | 1400 G |
| Ore Stone | All 4 spots | 1 G | 2 G | 2 G | 2 G | 3 G |
| Amethyst | Spots 2 and 4 | 4440 G | 5920 G | 7400 G | 8880 G | 10,360 G |
| Emerald | Spots 2 and 4 | 4440 G | 5920 G | 7400 G | 8880 G | 10,360 G |
| Sandrose | Spots 2 and 4 | 4440 G | 5920 G | 7400 G | 8880 G | 10,360 G |
| Topaz | Spots 2 and 4 | 4440 G | 5920 G | 7400 G | 8880 G | 10,360 G |
| Peridot | Spots 2 and 4 | 4440 G | 5920 G | 7400 G | 8880 G | 10,360 G |
| Fluorite | Spots 2 and 4 | 4440 G | 5920 G | 7400 G | 8880 G | 10,360 G |
| Agate | Spots 2 and 4 | 4440 G | 5920 G | 7400 G | 8880 G | 10,360 G |
| Ruby | Spots 2 and 4 | 4440 G | 5920 G | 7400 G | 8880 G | 10,360 G |
| Jade | Spots 2 and 4 | 4800 G | 6400 G | 8000 G | 9600 G | 11,200 G |
| Moon Stone | Spots 2 and 4 | 5400 G | 7200 G | 9000 G | 10,800 G | 12,600 G |
| Diamond | Spots 2 and 4 | 6000 G | 8000 G | 10,000 G | 12,000 G | 14,000 G |
| Pink Diamond | Spots 2 and 4 | 18,000 G | 24,000 G | 30,000 G | 36,000 G | 42,000 G |
| Red Wonderful | Spots 2 and 4 (Fall) All 4 spots (Spring, Summer, Winter) |
(Can't sell) |
| Orange Wonderful | Spots 2 and 4 (Fall) All 4 spots (Spring, Summer, Winter) |
(Can't sell) |
The Red and Orange Wonderful Stones can appear in the mine foraging spots if you haven't already found them in their normal locations.
Help and Admin Contact | Site Map | Harvest Moon News | Privacy Policy | Twitter | Game Credits
