Controls and Menus
Controlling the game is fairly easy to do. The game uses the Nintendo 3DS top screen for the main display while the lower touch screen is for the world map. You can tap on the world map to see the entire area of Echo Village or to see the details of the houses and villager locations just in the area you are currently in.
The touch screen is not used for movement, like in Harvest Moon: Island of Happiness. This game does not require stylus controls for character movement. Use the slide Circle Pad to make your character move direction; press gently in the direction you want to go to make your character walk, or press with more force to make your character run.
| A Button | - Talking to villagers or animals - Picking up an item off the ground - Selecting shop inventory items to buy and to confirm purchases - While conversation text is appearing, press A again to speed up the text speed - Use an equipped tool |
| B Button | - Cancel out of opened menus - Cancel purchases when buying shop items - Jump - While conversation text is appearing, press B again to speed up the text speed |
| X Button | - Opens main menu - Destroy (toss) a selected item when viewing the contents of your bag |
| Y Button | - Un-equip a tool |
| R Button | - Opens the equipment ring menu |
| L Button | - Not used |

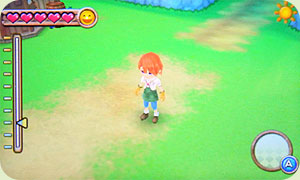
The Control Pad below the Circle Pad is used for adjusting the in-game camera. Press left or right to change the horizontal viewpoint, and press up or down to change the vertical viewpoint. The meter on the left-side of the screen will indicate how far you are zoomed in or zoomed out. The in/out camera view will stay that way until you press up or down to adjust it again, but the left/right view will return to its default position when you move areas.
Adjusting the camera angle is good for finding critters hidden on tree trunks, or for getting a close-up look at a villager. Changing the angle is also handy when you are in Edit mode and are trying to place an object that seems to have an obstacle in its way.
Main Menu
The main menu is accessed by pressing the X button. Opening the menu will temporarily pause the game.
- Bag will open your rucksack, which is separated into different categories: All, Tools, Seeds, Produce, Cooked Items, Fish, Critters, and Miscellaneous. You can group your bagged items by pressing Y, which will combine like-items into stacks. Keep in mind that if an items has a Star Rank, then the stars will average together. If you were saving a 5-Star Potato for the Harvest Festival and you sorted it with your 1-Star Potato, you won't have a 5-Star Potato anymore! Only use the Sort if you are really desperate for space and you don't want to utilize your farmhouse storage.
- Blueprints will list all of the blueprints you've obtained so you don't have to go back to your workshop to look at them. If you press the A button when viewing a blueprint, you can see the materials it requires for construction and how many of each material you have. Constructing the item must be done inside of your workshop and can't be done through the main menu.
- Restoration Plans are assigned to you by Dunhill. You will need to finish his five Renovation Plans to complete the main story and revitalize Echo Village. New plans will be added to your Restoration Plans menu as you complete the previous ones.
- Save/Load is your save game diary. You can save at any time (except for during cut scenes, of course) and you have two save slots. You can over-write one save game with the other, so be careful when saving.
- Return will close the main menu.